
Upload images
The rule is: Each page has a header image. You can chose an existing image from the library, or you upload a new image.
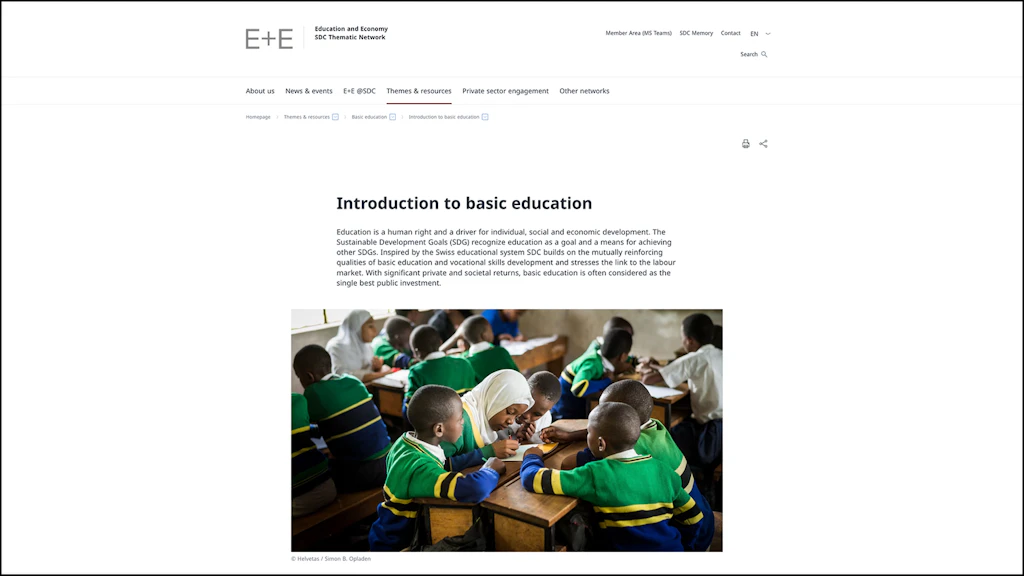
Find the right image
You must have the copyright for every image you upload! You can use photos that you took at the workshop or during the project visit. Alternatively, you can ask the SDC media team for access to their library. Alternatively, you can generate AI images or download images from an online library.
- Use Copilot on your SDC computer to generate images. Add the caption ‘Generated with AI’ to the image metadata (see Upload).
- Pixabay.com is probably the best place to find royalty free images. Add the copyright 'Name of photographer on Pixabay' to the image metadata (see Upload).
Edit the image
We are trying hard to maintain a consistent look across the pages. It is important that new images adhere to certain technical criteria.
- The image format for the header image is 16:9. Crop images to this format if they are a different size. For this you need to use the image editing application on your computer. Images placed in the page body can have a different format (4:3 or 1:1 etc.)
- Image size is 1920*1080 pixels for 16:9 image formats. Do not upload smaller images!
- Only use AI-generated images if no other options are available.
- Every page has a header image. If you decide against the header image, make sure your page has a teaser image (see Insert).
Upload images
You can add an image to a page either by uploading it directly to the page or by uploading it to the image library and then inserting it into the page. The upload mask is the same in both cases. The upload mask offers many metadata fields. The fields in bold here below are mandatory.
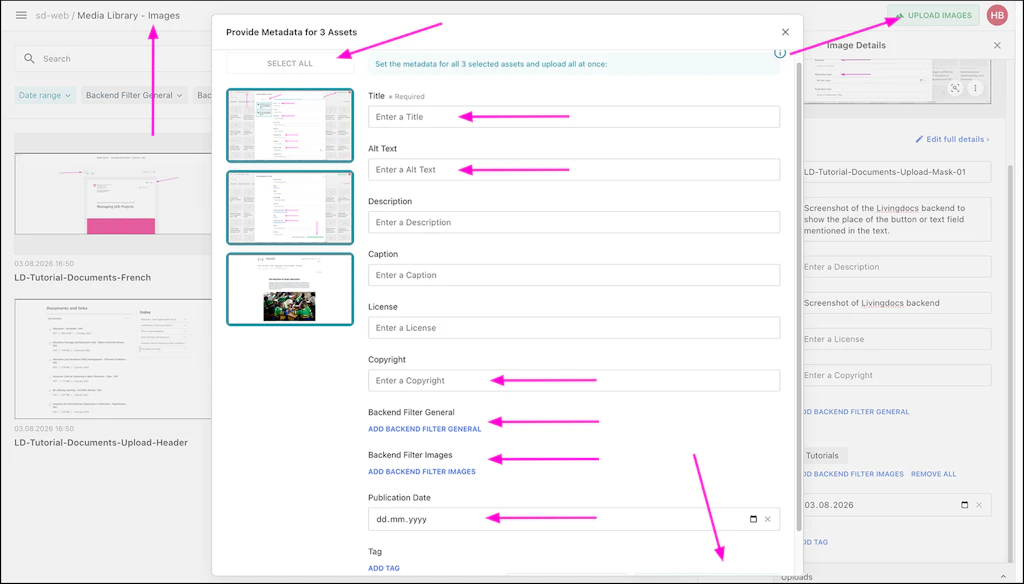
- Make sure you are in the Media Library - Images.
- Click on UPLOAD IMAGES.
- You can upload more than one image. To edit metadata for several images click on SELECT ALL.
- Title: The title will help you to find the image in the library.
- Alt Text: Describe the image in one or two sentences. This will help visitors with impaired vision using a screen reader to understand what the image shows.
- Description: This text appears below the image when used in a Slideshow component.
- Caption: This text appears below the image.
- Copyright: Put down the name and or organisation that owns the image. When you download an image from a web library such as Pixabay write ‘Name of photographer on Pixabay’. If you use AI generated image write 'AI generated'. You don't need to put the Copyright of SDC owned images.
- Backend Filter General: Chose from the main E+E topics.
- Backend Filter Images: Chose the image type.
- Publication date: Add the date on which the photos was created. If you don't have that date. Add the date you uploaded the image to Livingdocs.
- Tag: Do not use tags on images. Images with tags will appear in the Manual Download List component. This is an unfortunate system bug.
Insert
To insert an image into the page body insert first the page component Image from the component column on the right. When you click on the component its editing tools will display.
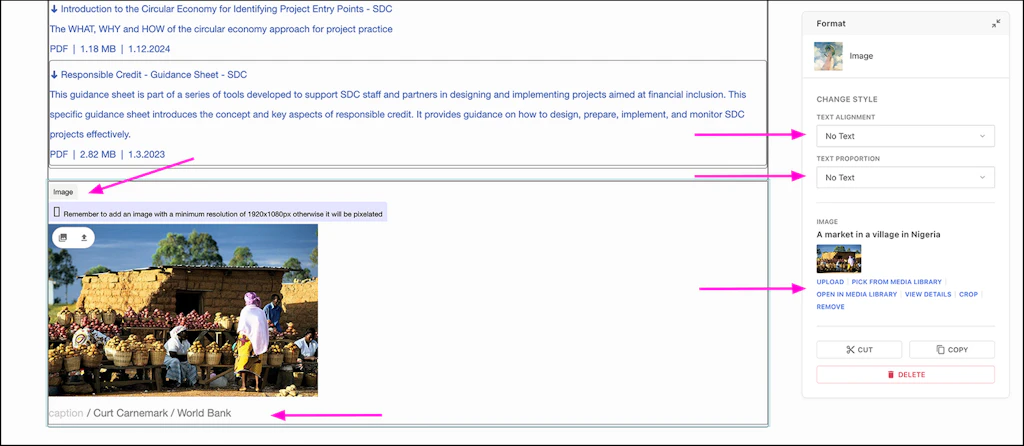
- TEXT ALIGNMENT and TEXT PROPORTION: Use these fields if you want to add text next to the image.
- IMAGE: Different editing tools are at your disposal. To insert an image into the image component use UPLOAD or PICK FROM MEDIA LIBRARY. To edit its metadata use OPEN IN MEDIA LIBRARY or VIEW DETAILS. To change the aspect ratio use CROP.
- REMOVE: If you don't want to use a header image, do not delete the image component. Instead click on REMOVE. Removing the image component in the lead section of the page can lead to problems later on.
- Caption and Copyright: Once an image is inserted, its caption and copyright will display below. You can overwrite the text here.
Need help with your page?
Switzerland
Hynek supports our network with everything related to Livingdocs and MS Teams.